| SYMBOL | COMMAND | ACTION | KEYBOARD COMMAND |
 |
Pattern Options | Allows you to cut down hood, arc trailing edge, wrap edge | |
| Cut Down Hood | Lower the top line of a partial hood | ||
| Arc Trailing Edge | Convert straight edge of partial hood to a bikini cut | ||
| Wrap Edges | Extends the edges of a part that are marked extendable | ||
 |
Plot | Plots all items in window | CTRL + P |
 |
Plot Selected | Plots only items highlighted in window | CTRL + SHIFT + P |
| Select | Pointer allows you to select entity. Left click part to select/deselect. | S | |
| Rotate | Allows you to rotate highlighted items. Hold down left click while rotating. Right click allows you to move the axis point. |
R | |
 |
Resize | Allows you to resize the portion of the kit you have highlighted by left clicking and dragging the mouse from the boxes produced | |
| Offset | Create an inline or outline of an entity | ||
 |
Tape Measure | Left click and drag mouse to extend tape measure | |
 |
Move Canvas | Left click and hold to move canvas | SPACE BAR |
| Fit To Screen | Fill your screen with all parts in the window | CTRL + SPACE BAR | |
| Zoom into Selected Area |
Drag a box around what you would like to zoom into. | ||
 |
Cut | Removes items selected to be pasted somewhere else | CTRL + X |
| Copy | Allows you to copy items selected | CTRL + C | |
 |
Paste | Allows you to paste items selected | CTRL + V |
| Delete | Deletes highlighted items | DEL | |
 |
Align Right | Align all selected parts to the right most point | |
 |
Align Horizontal Center | Align all selected parts to the center | |
 |
Align Left | Align all selected parts to the left most point | |
 |
Align Bottom | Align all selected parts to the bottom | |
 |
Align Middle | Align all selected parts to the middle | |
 |
Align Top | Align all selected parts to the top | |
 |
Distribute Horizontal | Distribute all selected parts aligning horizontally | |
 |
Distribute Vertical | Distribute all selected parts aligning vertically | |
 |
Flip Vertically | Flips the highlighted portion of the kit vertically | |
 |
Flip Horizontally | Flips the highlighted portion of the kit Horizontally | |
 |
Mirror | Copies and flips an open entity on the Y-axis | F11 |
 |
Copy and Arrange |
Copy and flip current selection in relation to another selected entity. If you need to add the signal lamp cut out to the opposite side of a bumper, select signal lamp hole first, then press shift + F11 and click within the bumper. This will copy and flip the cutout to the same spot on the opposite side. | SHIFT + F11 |
 |
Add Text | Allows you to enter text into the kit. Font and height of text must be entered. | |
 |
Draw Path | Create new entity using left mouse click. Right click to close entity | |
| Path Merge | Combine or subtract two overlapping entities | ||
 |
Draw Rectangle | Left click and drag mouse to create a rectangle to your desired size. Once left click is released the shape will be locked in |
|
 |
Draw Radiused Rectangle | Left click and drag mouse to create a radiused rectangle to your desired size. Once left click is released the shape will be locked in | |
 |
Draw Ellipse | Left click and drag mouse to create a circle / oval to your desired size. Once left click is released the shape will be locked in |
|
 |
Hide Pricing |
By clicking this you can hide your pricing from your customer. |
|
 |
Layout View |
Where each piece should lay out on the vehicle |
|
 |
Plot View |
Where each piece is laid out for the plot |
|
 |
Tack Diagram |
Shows an installation diagram of the selected pattern, if the pattern has an unconventional installation procedure |
|
 |
Images |
Shows an image of the vehicle associated with the pattern |
|
 |
Install Notes |
View designer notes for the current pattern |
|
|
Below are commands only selectable in EDIT MODE |
|||
| SYMBOL | COMMAND | ACTION | KEYBOARD COMMAND |
 |
EDIT MODE |
Make edits to the selected pattern. Entity must be selected for Edit Mode to appear. |
E |
| Select |
Pointer allows you to select entity. Left click part to select/deselect. |
S | |
| Rotate |
Allows you to rotate highlighted items. Hold down left click while rotating. Right click allows you to move the axis point. |
R | |
| Tape Measure |
Left click and drag mouse to extend tape measure |
||
| Move Canvas |
Left click and drag to move canvas |
HOLD SPACE BAR | |
| Open Entity |
Open the selected part to add or remove points |
||
| Add Points |
Allows you to add extra points into a kit by left clicking the mouse while dragging perpendicular across the line in kit and |
||
 |
Remove Points |
Erases points from the kit. Left click on points to be removed. When left click is released points will be removed. |
|
 |
Mark Extendable |
Left click with pointer the part to be made extendable. Once highlighted click mark extendable Left click allows you to toggle on and off sections of the kit you want to extend between the points |
|
| Mark Pre-Wrap edge |
This allows you to mark an edge that is already wrapped |
||
| Fit To Screen |
Fill your screen with all parts in the window |
CTRL + SPACE BAR | |
| Zoom into Selected Area |
Drag a box around what you would like to zoom into |
||
| Delete |
Deletes highlighted items |
DEL | |
| Convert To Curve |
Selected points will be converted to a curve |
F6 | |
| Straighten Segment |
Selected points will be converted to a straight line |
F5 | |
| TAB | COMMAND |
ACTION |
KEYBOARD COMMAND |
| File | Design Browser |
Relaunches Home Page |
|
| File | New |
Opens new drawing form to blank canvas |
CTRL + N |
| File | Save Revision |
Saves current pattern as an update to an existing revision |
CTRL + S |
| File | Save Revision As |
Saves current pattern as a new revision |
CTRL + SHIFT + S |
| File | Import From EPS |
Imports file from drive to drawing form. Supports EPS and DXF files |
|
| File | Plot |
Plots all items in window |
CTRL + P |
| File | Plot Selected |
Plots only items highlighted in window |
CTRL + SHIFT + P |
| File | Advanced Settings |
Customizable Plotter Settings (see below) |
|
| File | Plot Label Format Settings > Settings |
Setup for label printing when plotting |
|
| File | Previous Plot Labels |
View label printing history |
|
| File | Refresh Preferences |
Refreshes preferences to current settings |
|
| File | Exit |
Closes DAP |
|
| Edit | Undo |
Undo last command |
CTRL + Z |
| Edit | Redo |
Redo last command |
CTRL + Y |
| Edit | Cut |
Copies and removes current selection from pattern |
CTRL + X |
| Edit | Copy |
Copies current selection |
CTRL + C |
| Edit | Paste |
Pastes copied objects into pattern |
CTRL + V |
| Edit | Delete |
Deletes current selection from pattern |
DELETE |
| Edit | Clear Guide Lines |
Removes all Guide Lines from pattern (Cyan lines) |
|
| Edit | Create Guide Entity |
Creates pasteback of current selection (Dark Green lines) |
F9 |
| Edit | Clear Guide Entities |
Removes all pastebacks from pattern (Dark Green lines) |
F10 |
| View | Display Coverage Labels |
Toggles coverage labels visibility (i.e. Full Hood) |
|
| View | Display Rulers |
Toggles X and Y axis ruler visibility |
|
| Selection | Select All |
Selects all objects in pattern |
CTRL + A |
| Selection | Unselect All |
Unselects all selected objects in pattern |
CTRL + U |
| Selection | Convert to Segment |
Converts current selection to straight line (Edit mode only) |
F5 |
| Selection | Convert to Curve |
Converts current selection to a single curve (Edit mode only) |
F6 |
| Selection | Mirror |
Copies and flips an open entity on the Y-axis |
F11 |
| Selection | Align Right |
Align all selected parts to the right most point |
|
| Selection | Align Center |
Align all selected parts to the center |
|
| Selection | Align Left |
Align all selected parts to the left most point |
|
| Selection | Align Bottom |
Align all selected parts to the bottom |
|
| Selection | Align Middle |
Align all selected parts to the middle |
|
| Selection | Align Top |
Align all selected parts to the top |
|
| Selection | Distribute Horizontal |
Distribute all selected parts aligning horizontally |
|
| Selection | Distribute Vertical |
Distribute all selected parts aligning vertically |
|
| Selection | Group |
Groups current selection together |
CTRL + G |
| Selection | Ungroup |
Ungroups any grouped entities in selection |
CTRL + SHIFT + G |
| Tools | Pattern Options |
Launches Pattern Customization window |
|
| Tools | Insert Sized Rectangle |
Inserts a Rectangle with specified dimensions |
|
| Tools | Insert Sized Oval |
Inserts an Oval with specified dimensions |
|
| Tools | Bisect Entity |
Opens Bisect window to split selected entity vertically or horizontally |
|
| Tools | Nesting Settings |
Opens Nesting Settings window to change nesting preferences |
|
| Options | Copy and Arrange |
Copy and flip current selection in relation to another selected entity. If you need to add the signal lamp cutout to the opposite side of a bumper, select signal lamp hole first, then press shift + F11 and click within the bumper. This will copy and flip the cutout to the same spot on the opposite side. |
SHIFT + F11 |
| Options | Curve Control > Smooth |
Sets Curve type to Smooth (matches angle, ignores length) |
F1 |
| Options | Curve Control > Sharp |
Sets Curve type to Sharp (ignores angle and length) |
F2 |
| Options | Curve Control > Symmetric |
Sets Curve type to Symmetric (matches angle and length) |
F3 |
| Window | Kit Search |
Switches back to the DAP Browser |
|
| Window | (Part Number) |
Switches to another tab you have open, such another opened pattern |
|
| Help | About |
Shows the current version of DAP |
|
|
Miscellaneous Drawing Form Commands |
|||
|
|
Create Vertical |
|
V |
|
|
Create Horizontal |
|
H |
|
|
Perpendicular |
|
X |
|
|
Undo |
CTRL + Z |
|
|
|
Redo |
|
CTRL + Y |
Advanced Plotter Settings:
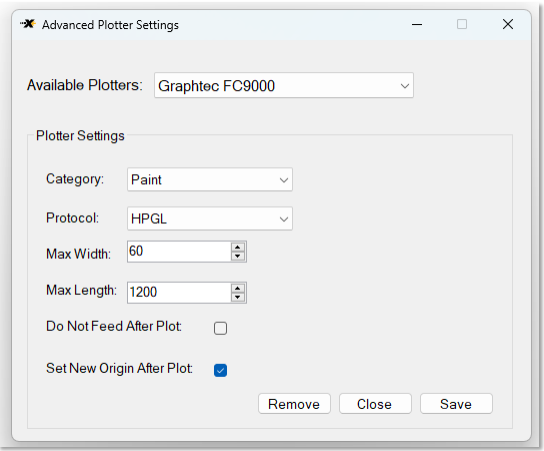
- Available Plotters = select plotter to apply settings to
- Category = set plotter default settings per material type
- Protocol = set plotter command protocol to use when plotting (recommended HPGL)
- Max Width = set maximum width per plot. Plots made will not exceed this width
- Max Length = set maximum length per plot. Plots made will not exceed this length
- Do Not Feed After Plot = Prevents plotter from feeding material forward after completion
- Set New Origin After Plot = Plotter will set a new origin point behind the previous plot after completion
- Remove = Removes settings from currently selected plotter
- Close = Closes Advanced Plotter Settings menu
- Save = Saves current settings